The Tablet Manager
The Gaiptek Tablet Manager is a front-end to the programmatic features found in the Linux Kernel Device Driver and the X11 Input Driver. With the Tablet Manager, you can inspect and dynamically program the tablet, as well as inspect and modify the behavior of the two drivers. Doing so does not mean you have to reboot or reload the driver, nor do you have to restart the X Server.
Having the Gaiptek Tablet Manager running does not affect the normal use of your tablet: you can have it active while running other applications. It won't affect the tablet or its driver's behavior until you reprogram them.
Both the Kernel and X Server Drivers support bidirectional interaction with the user. The X Server Driver uses the Tablet Manager as the front-end to its programmatic interface. The Linux Kernel driver natively supports a file-oriented user interface, through the sysfs (or procfs on Linux 2.4.x) virtual file system. We believe you'll find the file-oriented interface useful in batch processing, but will use this interface the majority of the time.
 |
Screen Layout
The Tablet Manager is actually three programs in one. One section of the program communicates with the Kernel Driver. The other communicates with the X Server Input Driver. The remaining section provides diagnostics for your tablet. Along those lines, we attempted to break down the screens by their function.
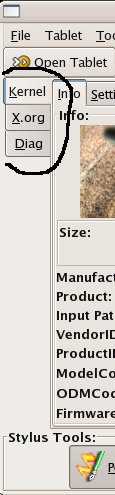 |
Looking at the main screen, you'll notice that we have set up a tab control along the left side of the screen. Those tabs control whether you see Kernel-, X Server-, or Diagnostics-related screens. The left-handed tab controls appear on every page.
Controls Common To Every Page
But those are not the only controls that appear on every page. The menubar and associated toolbar appears on every page, as well as the series of buttons called the "Stylus Tools" appears on every page, at the same location.
 |
 |
The controls along the top of the screen are Kernel Driver-related; the bottom controls are Kernel Driver-related, although you'll mostly see their affect through the X Server Driver. The point is, the two drivers are very interdependent: someone wanting to configure one driver may well want to also work with the other driver.
1. Which Tablet Is Being Managed?
The first control is something that's not very apparent at first – the Window's title decoration. We use it to convey which tablet you are inspecting and/or programming.
One of the problems we have, when supporting multiple tablets, is conveying which tablet is presently being viewed and/or modified to you in an obvious way. The Linux Kernel does not assign device driver entries for USB input devices in the same way as it does for RS-232C. E.g., there is no /dev/tty01 that always refers to the device connected to the first serial port. And, should no device be attached to the given serial port, the device entry will still exists in /dev.
Instead, for input devices, the kernel might assign a device entry like, /dev/input/event5, to your tablet. But even then, that device entry assignment is transitory: it can change every time you reboot your system. (There is background on this that we'll discuss later.)
We get around this issue by displaying the USB connector that's physically attached to your tablet. If you look at the title bar shown below, we display that information, much like other programs will display the name of the file they are editing.
|
2. The “Button” Controls
You'll notice in the above picture, that there are a series of buttons going along the top of the page. These buttons appear on all pages of the Tablet Manager.
2.1 The “Open Tablet” Button
Knowing what we now know about the Window's title, and how we address telling you which tablet is being presented, you might wonder how to have the Tablet Manager deal with your other tablet(s). That's easy – press the “Open Tablet” button, or choose Tablet|Open Tablet from the menu, and you will see the following panel:
 |
And as you might expect, the pull-down has the list of Aiptek tablets controlled by the Linux Kernel Device Driver, identified by the USB connector they are attached to. Merely choose the correct tablet, and press the “OK” button. The panel disappears, and the Tablet Manager displays information about the new tablet.
Now, if you only have one tablet, do you need to go through the process of selecting and opening a tablet? No, (and also, No, if you have more than one) the Tablet Manager will automatically find and open the first Aiptek tablet it finds.
Of course, if you were in the process of reconfiguring the previous tablet, and did not yet go through the process of reprogramming it first, you'll lose your changes. Which is why there is a “Cancel” button. But it does beg the question, how do you program your tablet?
2.2 The “Program” Button
If you are in the process of modifying your tablet's configuration, or the Linux Kernel Device Driver's configuration, you might move the Tablet Manager from page to page, setting the parameters you want changed. And then, when satisfied, you'll want to program the tablet. This is what the “Program” button, or the Tablet|Program menu option, does for you.
(As you will later see, there is another “Program” Button elsewhere in the Tablet Manager, so let us stress: the one along the top of the screen deals with the Linux Kernel Device Driver. Don't set attributes for the X Server Driver and expect this button to program them for you. It won't. It just programs the Kernel Driver's attributes. No harm will come of it if you do, but we'd like to avoid frustrating you if we can.)
2.3 The "Refresh" Button
While inspecting/setting attributes from the Linux Kernel Device Driver, you might decide that you want to throw away your changes, and have the Tablet Manager, instead of showing your pending changes, instead re-present the tablet's and Linux Kernel Driver's current state. How to do this? With the “Refresh” button, or the Tablet|Refresh menu option.
(Again, this refreshes attributes from the Linux Kernel Device Driver. Not from the X Server Driver. And yes, there is another “Refresh” button, but it only appears on the X Server page. We'll discuss that later.)
2.4 The "Tools" Button
So far, every button we've described along the top of the page deals with the Linux Kernel Device Driver. Not this one. If you press the “Tools” button, or the Tools|Tools menu option, you'll get a panel that looks like,
 |
So, this brings up the question, what does this panel do? Well, if you look at the “Stylus Tools”, which appears at the bottom of every page, you'll notice that they are the same buttons, just in a very small vertical panel. That's because, the purpose of these buttons is fairly central to how you use the tablet with X client applications. You'll find yourself wanting to switch your tablet's behavior from that of a pen to an airbrush, etc., so often that you'll have the Tablet Manager running at the same time.
That's a good thing, but, as small as we made the pages, you probably want more screen space allocated to your drawing program. So, here is this very small panel. You bring the “Tools” panel up, minimize the Tablet Manager main page(s), and you're in business. Of course, if you want to return to the main pages, press the “Main App” button. We'll describe what it means to behave like an Eraser later, when talking about the X Server Driver functions.
2.5 The “Help” Button
Right now, this will present to you the Help|About panel. It's a listing of people to blame for the Tablet Manager. As always, we gratefully accept patches.
2.6 The “Quit” Button
It does what you would expect. And no, it doesn't care whether you've remembered to save your changes to the tablet, the Linux Kernel Device Driver, or the X Server Device Driver. This isn't a word processor; hopefully your not writing your PhD thesis with the Gaiptek Tablet Manager.
2.7 The “Stylus Tools” Buttons
These buttons are located along the bottom of every page of the main Tablet Manager screens. Similar to the toolbar buttons, these buttons affect is mostly seen in how the tablet currently behaves in conjunction with the X Server Device Driver. E.g., does the stylus behave like a pen, pencil, etc.? We'll describe what that means later. For now, you should note that these are push buttons: whichever mode your tablet is in, the appropriate button is shown as being depressed.
3. The Linux Kernel Driver Pages
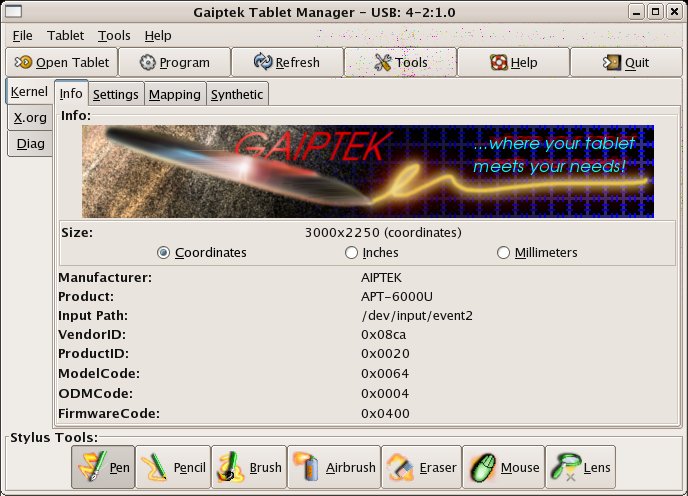
3.1 The Info Page
As it has been awhile since you've last seen it, here is what the Info page looks like, below. The Info Page describes attributes of your tablet, as determined from the Linux Kernel Device Driver.
You might be wondering, why are we displaying all of this information? Well, when things go wrong, the more information you have at hand, the easier it is to diagnose what happened, and what to do. Such as, what? Well, without giving away a lot of what's described in the Diagnostics section, we'll just tell you that digital tablets look a lot like mice and joysticks to other device drivers. And, because of the macro keys along the top of the drawing area, which we support, the tablet looks a bit like a keyboard... So, what if one of these other drivers get confused? Hence, the Info page.
 |
3.1.2 Size
This shows how big the tablet's physical drawing area is, in either coordinates, inches or millimeters. This is the best way to determine whether there is any communication issues between the tablet and USB subsystem/Linux Kernel. How is that? Well, if your tablet suddenly reports that it's drawing area is 100x100 coordinates, you know you are in trouble.
3.1.3 Manufacturer
This is a string representation of the tablet's manufacturer.
3.1.4 Product
This is a string representation of the tablet's model. In addition to telling you if there are any communication issues, looking at the size of the tablet is also the best way to determine what model of tablet is connected. Why do we say that? Well, the screenshot above is of the author's APT-8000U; several tablet models have been known to share model identifiers with other Aiptek models. More recent tablets will return a generic model identifier.
3.1.5 Input Path
We mentioned before that Linux does not assign device driver entry name to your tablet based on the connector, like it does for the RS-232C, or hard disc interface. Instead, it will dole out device entries dynamically, based on the order in which device drivers are loaded/initialized during boot up, and/or the availability of entry names when the tablet is hot-plugged into the system.
What this means is, today your tablet might have /dev/input/event1 assigned to it. Tomorrow, it might be /dev/input/event7. If you plug an unplug hot-pluggable USB devices, like your tablet, mice and joysticks, there's more variance.
Also, it does no good to predict where the tablet will be mapped based on order of device driver modules are loaded, hardware is recognized, etc. There is movement afoot to speed up the boot cycle of Linux. What that means is, device drivers that used to wait for one another to initialize sequentially no longer do so. Where they can, they'll load and initialize in parallel with each other, which makes determining the order that they'll complete (and be assigned a device entry) hard to determine.
So, you might like to know the device entry that has been assigned to your tablet. Programs like gpm and the X Server tend to show an interest in this information. Note that our interface to udev tends to resolve this issue by ensuring that there is a softlink called /dev/input/aiptek, which will point to the device entry where the tablet's data is being routed to.
3.1.6 VendorID
This is the manufacturer code, shown in hexadecimal.
3.1.7 ProductID
This is the product code, show in hexadecimal. Note what we said about reuse of product codes.
3.1.8 ModelCode
More appropriately, the sub-model ID, in hexadecimal. Also tends to not be unique among the tablets.
3.1.9 ODMCode
The ODM Code describes the third party company who produced your tablet for the manufacturer. You will find that this helps isolate which manufacturing batch your tablet belongs to.
3.1.10 Firmware Code
The version of the firmware/BIOS installed on your tablet, in hexadecimal.
3.2 The “Settings” Page
That's enough dry information for now. Moving to the Settings page, we now have controls that map to attributes of the Linux Kernel Device Driver, and the tablet itself.
 |
3.2.1 Pointer Mode Control
This series of buttons allow you to control from which device input reports will be accepted from. Your tablet comes with both a Stylus and a Mouse which can be used along the drawing surface of the tablet.
If, for example, you specify that you only want input reports from the Stylus, that means that all reports from the Mouse will be filtered out. That's useful, if you placed the Mouse too near your drawing area, and you are getting input reports from it.
By default the Linux Kernel Device Driver accepts reports from either device.
The information presented by this control is the same as that kept in the pointer_mode file. (See the section on the Linux Kernel Device Driver.)
3.2.2 Coordinate Mode Control
This series of buttons allow you to control whether the tablet returns relative coordinate motion reports or absolute coordinate motion reports. The difference between the two is fairly simple: if the stylus is at location 100,100 on the drawing area, and you move it to the left 5 coordinates, the stylus moves -5 coordinates along the X axis in relative mode, and to 95,100 in absolute mode.
The X Server Driver's absolute/relative setting is kept independent from this, the Linux Kernel Device Driver's setting. (How? The X Server Driver will convert relative coordinate reports from the tablet into absolute reports, if needed.)
The information presented by this control is the same as that kept in the coordinate_mode file. (See the section on the Linux Kernel Device Driver.)
3.2.3 Jitter
This is a delay, following the pressing or depressing of a button on the Stylus or Mouse, during which all input events from the tablet are ignored. Especially with respect to the Stylus, when pressing one of the buttons, the chances of the tip moving as your hand steadies itself is fairly high. During that time, the stylus can otherwise send spurious input reports. This is a text entry control, and accepts positive numeric values, in milliseconds.
Obviously, to disable the Jitter timer, set it to 0 milliseconds.
The information presented by this control is the same as that kept in the jitter file. (See the section on the Linux Kernel Device Driver.)
3.2.4 Programmatic Delay
When programming the tablet, there is a delay specified in the communications protocol. What we've noticed is that certain tablets prefer differing length of delays. 400ms and 50ms have been seen as prevalent, and indeed, the Linux Kernel Device Driver attempts to determine the optimal setting during boot time.
The information presented by this control is the same as that kept in the delay file. (See the section on the Linux Kernel Device Driver.)
3.3 The “Mapping” Page
The Mapping Page allows you to inspect and set what sequences the Stylus buttons and the Mouse buttons send when pressed. By default, the Mouse's left button will send the Mouse Left Button sequence when pressed. But, you can change that so it instead sends the right button's sequence, or the middle button's. Same thing for the Stylus. No, you cannot map the Stylus buttons to send Mouse button sequences!
 |
3.3.1 Stylus Button Mapping
Well, we sort of ruined the surprise above. Except, we should note, both the upper and lower Stylus buttons must be mapped to return some sequence, and no, they cannot both return the same sequence. (Why? It just makes good sense.)
These controls correspond to the stylus_lower and stylus_upper files kept by the Linux Kernel Device Driver.
3.3.2 Mouse Button Mapping
Very much the same as the Stylus buttons, except there are three of them, and setting/resetting of sequences might be very useful to the left-handed.
These controls correspond to the mouse_left, mouse_middle and mouse_right files kept by the Linux Kernel Device Driver.
3.4. The “Synthetic” Page
Despite how capable your Aiptek Tablet is, there are some functions that it does not provide... Functions we thought it ought to provide... So, we cheat: we've set up the Linux Kernel Device Driver to pretend the tablet has these features.
But, why the pretense? Well, we currently have what is considered a three-dimensional input device (X, Y, and Pressure.) Each of these synthetic events are considered a new dimension, and frankly, knowing the angle that a Stylus is held should affect the shape of the brush, or tip, against the drawing surface...
 |
3.4.1 The “Wheel Event” Control
That's right: your Aiptek Mouse has a Wheel. You just can't see nor feel it. This is a one-time event: you set the wheel amount sider to a value between 0 and 1024, and press the Apply Wheel button. Along with the next input event read by the Kernel Device Driver, the wheel event will be reported. No subsequent wheel events will be reported, until/unless you use the control, again.
Unlike other controls in the Tablet Manager, pressing the Apply Wheel button programs the tablet right now. (The other controls wait until you press the Program button or the Tablet|Program menu option before taking effect.)
This control corresponds to the wheel file maintained by the Linux Kernel Device Driver.
3.4.2 The “X-Axis Tilt” Control
Imaginary sensors note the angle your hand holds the Stylus against the drawing surface, along the X-Axis (left-right.) Unlike the Wheel, X-Axis reports are sent continuously by the Linux Kernel Device Driver when this attribute is enabled. Looking at the page above, we have a control to indicate whether reports will be sent along with any and all tablet input events. Once enabled, values range between -128 and 127. (-128, Stylus tilts to the left; 127, Stylus tilts to the right.)
This control corresponds to the xtilt file maintained by the Linux Kernel Device Driver.
3.4.3 The “Y-Axis Tilt” Control
Imaginary sensors note the angle your hand holds the Stylus against the drawing surface, along the Y-Axis (rear-front.) Unlike the Wheel, Y-Axis reports are sent continuously by the Linux Kernel Device Driver when this attribute is enabled. Looking at the page above, we have a control to indicate whether reports will be sent along with any and all tablet input events. Once enabled, values range between -128 and 127. (-128, Stylus tilts to the rear; 127, Stylus tilts to the front of the drawing area.)
This control corresponds to the ytilt file maintained by the Linux Kernel Device Driver.
4. The X Server Driver Pages
The X Server Driver tab organizes its windows differently. Basically, the attributes don't "fit" onto individual pages as well as the Kernel Driver's attributes: they prefer to be seen together at the same time. So we've used more of a "tab" motif where sections of the screen change depending on which tabs you've selected. And as you can see, we have tabs on both the left- and right-handed side of the page.
As you recall in section 1, "Which Tablet is Being Managed", the Linux Kernel Device Driver supports multiple Aiptek tablets; we're able to keep track of which tablet is which, by presenting the USB connector information along the window's titlebar.
What that means is that the functions provided by the Tablet Open, Program, and Refresh buttons on the the menubar, that communicate with the Linux Kernel Device Driver, are also needed for the X Server Input Device Driver. They have to be distinct from one another, because both sets of controls have to appear on the X Server pages. Sounds hard, right? Let's look at the screenshot,
 |
Yes, there is a lot there, but let's zoom in on the X Server Input Device Driver's equivalent to the Tablet Open, Program, and Refresh buttons,
 |
So, that Listbox control called X Server Driver is the "Tablet Open" button. It contains the names of the X Server Input Device Driver device drivers associated with the given tablet. Remember, you can have up to three X Server device drivers per tablet, one that manages the Stylus input, one for the Puck, and the last for the Eraser (or Rubber.) Remember, even though you can name your drivers anything, environments like Gtk have fixed names for the tablet's device drivers that it is looking for. (If you were wondering why there is a label called Device Mapping, Type, telling you that your X Server Input Device is of type Stylus, well, that's why.) If you were to Tablet Open your other tablet, assuming you have another, that Listbox will contain different X Server Input Device Driver names.
So, those buttons marked Execute and Refresh, along the lower left of the screen are fairly obviously the equivalent to the Program and Refresh buttons along the menubar. No matter which page of the X Server Driver pages you move to, those controls appear at the same location. They don't program the Linux Kernel Device Driver; they program the X Server Input Device Driver.
4.1 The Common Controls
Well, we cheated, because the X Server Driver, Execute, and Refresh buttons appear on every X Server page. How about the other common controls? Well, you have Measurements, which allows you to specify whether units of measure will be displayed in Coordinates, Inches, or Millimeters. What measurements are those? Look over in the Active Area, and you'll see that xMax, et al, can be displayed in coordinates, inches or millimeters. Also, xThreshold and yThreshold, located on the Thresholds sub-page, can as well.
Focusing your attention to the Active Area tab again, on the right-hand side of the page, you'll notice the control, Use these Parameters. If you cycle through the xTop, xOffset, and xMax tabs, you'll see that control appears on all three tabs. What do they do? They allow you to select which set of Active Area parameters to use.
4.2 Left-Hand Side: the “Mapping” Tab Controls
The controls in Device Mapping present highly usable information.
 |
The Type label, for instance, describes the type of X Server Input Driver you are inspecting. As you recall, you can name your X Server drivers what you want (although toolkits like Gtk will conspire to limit your choices.) But there is still a possibility that you'll forget that "Pen" refers to your Stylus device driver.
The Physical label describes the device driver from entry from which input is read from. Recall, from the X Server Input Driver documentation, that you can give the X Server the name of a softlink, instead of the actual name of the device driver entry. Well, if you do indeed do that, the Tablet Manager is aware. So, Physical describes where data is read from, and the Logical label describes the name of the softlink you gave it.
(Why do we do that? Well, softlinks don't "move" very well when you plug/unplug the tablet. And, even if they do, the X Server still has an open file handle referring to the previous softlink location. So, bottom line, we display this information to remind you of any misdeeds you may have recently performed.)
DebugLevel accepts an integer, and sets the debugLevel that the driver uses to log it's messages to the X Server log file. "0" means to display no messages. This is the same as the 'Option "DebugLevel" "num"' line in the X Server configuration file.
HistorySize is analguous to the 'Option "HistorySize" "num"' option in the X Server configuration file.
ScreenNum is analguous to the 'Option "ScreenNo" "num" option in the X Server configuration file.
4.2.1 Left-Hand Side: the “Booleans” Tab Controls
This page describes a collection of boolean controls for the X Server Input Driver.
 |
| Control Name | Option in Configuration File | Explanation |
|---|---|---|
| Mode | Option "Mode" "absolute" | Allows you to specify whether the tablet will deliver relative or absolute coordinate reports. |
| Cursor | Option "Cursor" "puck" | Allows you to specify whether you want X to display a "puck" or "stylus" shaped cursor. |
| KeepShape | Option "KeepShape" "on" | Allows you to specify whether the tablet will deliver relative or absolute coordinate reports. |
| InvX | Option "InvX" "on" | Should the driver invert the incoming X coordinate reports. Effectively swaps left and rightside. |
| InvY | Option "InvY" "off | Should the driver invert the incoming Y coordinate reports. Effectively swaps the front and end of the drawing area. |
| AlwaysCore | Option "AlwaysCore" "on" | Allows you to specify whether this input device is considered the "core" input device. |
4.2.2 Left-Hand Side: the “Thresholds” Tab Controls
We use this page to keep controls for the movement thresholds. What are these? Well, let's say you move the stylus one coordinate to the right from its previous position. The question is, do you want the driver to pass that report to the X Server, or assume that any movement less than num coordinates is really your hand shaking, and so it should ignore it? That minimum required movement is a threshold. We support thresholds on three axes; since the "remaining" axes are synthetic (xTilt, yTilt and wheel), there is no reason to filter those reports (as you have to go out of your way to have them reported in the first place.)
Now as for the zMin/zMax controls: these specify minimum and maximum
values that will be passed to the X Server. Notice that this
accomplishes the same general task, that of filtering input, but isn't
the same as thresholds: thresholds are concerned with relative
movement, whereas zMin/zMax are concerned with absolute values.
So, where is xMin/xMax, and yMin/yMax? Silly person, those (obviously) control the size of the drawing area, and are thus Active Area parameters. Look at the right-hand side of the page. We'll explain those controls presently.
 |
Rather than bore you (and ourselves) with telling you that the xThreshold control affects your xThreshold setting, etc., ad nauseum, we'll instead tell you that all these filters can be disabled with a value of -1.
4.2.3 Left-Hand Side: the “Pressure” Tab Controls
By default, for each pressure reading, from 0 to 511, we'll report a value that ranges linearly from 0 to 511 to the X Server. But, if you would like to have the Stylus pressure be reported, with more Custom Pressure Curve.
 |
First, the Curve Type control allows you to select what type of curve you would like to use, the graph control underneath shows the curve, plotted for input values from 0 to 511. The X Server Input Driver supports three pre-defined curves: the Linear, Soft Log and Hard Log curves. Let's take a look at each:
 |
| 4.2.3.1 The Linear Curve |
Well, obviously the Linear Curve is a curve in name only. There is
no perturbation of values from read the tablet. E.g., if we read 23
from the tablet, we'll report 23 to the X Server.
 |
| 4.2.3.2 The Soft Log Curve |
This curve models the function, p = z2/512), and offers more sensitivity to higher tablet pressure reports (e.g., it tends to ignore lower-range values.)
 |
| 4.2.3.3 The Hard Log Curve |
This curve models the function, p = 512 * (z / 512) 1/2. Sensitivity is pronounced with lower value pressure reports, with a more linear slope appearing in the mid-scale values.
 |
| 4.2.3.4 The Custom Curve |
Now for the new curve type. Rather than try to guess at another good perturbation function, we thought we'd allow you to specify your own curve. To do so, we give you the matrix of datapoints, from pressure reading of 0 to 511: for each point, you get to go to the "Report Value" column and enter custom values. You're limited for values between 0 and 511, as that's the capacity of the tablet. Sounds like a lot of work, and it is. We make it easier for you by allowing you to use the curve points of the Linear, Soft Log or Hard Log curves as the starting point. Also, thankfully, we let you save your custom curve out to file, so you can reload it when desired.
4.3 Right-Hand Side: the Active Area Tabs
There are three pages of controls on the right hand side, these dealing with the Active Area. Why three pages? Well, the Active Area can be specified using one of three mutually exclusive parameter sets. So, not only do we want to know what your settings are, but we want to know which set of setting parameters you want to use.
But first, why would you want to restrict the Active Area? By default the tablet's entire drawing area is available to you. Well, let's say you are tracing a drawing from a piece of paper smaller than your drawing area. Now, if you bring the stylus outside of the edges of that paper, you might get a movement report from the tablet. Wouldn't you'd like to filter those reports out? We thought you would.
 |
| 4.3.1 The xMax/yMax Page |
You might remember when we were discussing Threshold values for the Pressure coordinate, where we noted that there is no xMin/xMax or yMin/yMax settings, because those are actually settings for the Active Area. And, here they are! Except, there is no xMin/yMin. They are assumed to be (0,0), the tablet's origin coordinate, located in the upper left hand corner of your tablet.
What's that? You'd like to set xMin and yMin? Well, look at the other two pages of Active Area coordinates, first...
 |
| 4.3.2 The xTop/xBottom Page |
 |
| 4.3.3 The xOffset/xSize Page |
You might note that control marked, "Use these Parameters" is on every page. Selecting one of the pages' controls activates the text entry controls on that page (otherwise, you cannot edit them, and they display values of -1, whose significance we'll explain shortly.) Obviously, selecting one selects one of the three mutually exclusive set of Active Area parameters.
Once you have selected an Active Area parameter, you'll have to enter values for the two- to four controls on the same page. In case you get confused as to what xMax or ySize represents, we put up hopefully-clear diagrams on every page for your reference.
Now, if you don't want to specify an Active Area setting, that you'd rather use the entire tablet's drawing area, what should you do? Well, choose an Active Area parameter anyway. They're mutually exclusive, and the software doesn't understand that they're all turned off. Then, set all the associated text controls to the value of -1. That's it, you now have control of the tablet's complete drawing area. Mind you, that's the default setting, anyway...
5. The “Diagnostics” Page
Occassionally, the tablet does not interact well the USB subsystem, or input from the tablet has been diverted from the Linux Kernel Device Driver to another device driver (the usual suspects are Mouse or Joystick drivers.) When these situation happen, you'll need to try to diagnose the situation, hence this screen. We'll describe diagnostics later; it's enough of a topic for it's own chapter. But for now, the screen:
 |
5.1 “From the Driver” Controls
The Table mapped to Device Driver label displays what driver the USB subsystem believe has control of the tablet. This is analguous to cat /proc/bus/usb/devices from the command line, but more convenient.
The Events label displays the number of events the Linux Kernel Device Driver believes that it has processed. This is the same as looking at the file, /sys/bus/usb/drivers/aiptek/usbConnector/event_count for Linux 2.6.x, or /proc/driver/aiptek/usbConnector/event_count on Linux 2.4.x. Note that these files display an unsigned long integer; as such, is is susceptable to wrap-around. This shouldn't concern you: you are really looking to see if the counter is incrementing. We should point out here, though, that the value displayed is static. It doesn't update until and unless you press the Refresh button on the toolbar.
The Diagnostics label displays the diagnostic message for the lastmost error condition the Linux Kernel Device Driver recognized since it has last been reprogrammed. See The Linux Kernel Device Driver documentation to see what error conditions it can report on.
5.2 Tablet Event Controls
When diagnosing error conditions, sometimes you have to see evidence that your movements on the tablet are being translated to events. From the command, the evtest diagnostic, written by Vojtech Pavlik fits the bill perfectly. But, this is a GUI tool, so when we press the Start button, we'd like to see,
 |
And so, we do. We're reading events from the Linux Kernel Device Driver, not from the X Server, so issues of Window focus do not apply. When you are through looking at the events, press the Stop button.
6. The File Commands
One thing we haven't yet discussed is the fact that you can save your tablets', their Kernel Driver settings, and their X Server Driver settings, into a single flat file. To what end? So you can load them back in. And, when you do so, the tablet, the Kernel driver, and the three X Server Input drivers are all reprogrammed at once. This is fairly handy for people who have their tablets set up "just right," and want to be able to maintain those settings, even after reboots.
So, where are the controls? Would you believe, in the menu, as File|Open and File|Save?